Humbly simple F# Maybe monad application scenario

Introduction

I won’t turn this article in another spammish claim about monads and functional programming. If you are interested in digging inside it, from a theoretical point of view, I suggest you start here to get the gist of what I’m talking about. Let’s say briefly that monads are a useful and clever way to write safe and more beautiful code. For once let’s focus to the practical side of the question, without further ado.

A simple scenario

Suppose you are working on a real world application for a supermarket, and you need to create a simple data structure to store products, with their IDs and prices. The pair (key,value) immediately make the word dictionary to spring up in mind. So you want to create a data structures that embeds a dictionary and you want also to expose a bunch of APIs for inserting a new product and to get the price of a product given his ID. In a standard Object Oriented language you would end up writing a thing like this:

class Inventory
{
public:
    Inventory();
    void Stock(const std::string& id, float price){ inventory_[id] = price; }
    float Price(const std::string& id){ ... }
private:
    std::map < std::string, float> inventory_;
};

Let’s focus our attention to the Price method. You are asking the price for a certain product, given his id. This translates in a lookup inside our inventory map. But what about if the product doesn’t exists? Good programmers would throw an exception, that will be captured at run-time somewhere, leading to a code that we know very well, and that’s not so beautiful to look at:

float sumPrices(const Inventory& i, const std::string& id1, const std::string id2)
{
    try
    {
      float p1 = i.Price(id1);
      float p2 = i.Price(id2);
      return p1 + p2;
    } catch (ProductNotFoundException e)
    { //handle somehow }

}

Monads and F# comes to the rescue, allowing us to write a great deal more beautiful code than this. Let’s see how.

Separating the impure from the pure

Now let’s move our problem in the F# and .NET world. We need to create a type to model an Inventory, expose the above mentioned APIs and also provide a mechanism to sum prices, printing the total whether all the id were found, an error otherwise. The simplest thing to do is to reuse one of the existing .NET classes, to be precise a System.Collections.Generic.Dictionary:

type ProductId = string
type Price = float

type Inventory() =
    let inv_ = new System.Collections.Generic.Dictionary<ProductId, Price>()

    member this.Stock (id : ProductId) (price : Price) =
        inv_.Add(id, price)

So, we have defined two type synonyms for a better understanding of the problem, this new type as well as a member to stock a new product, given its id and its price. Now we must be wary about writing the Price member, because in case of unsuccessful lookup .NET throws a
System.Collections.Generic.KeyNotFoundException, which is not good in our pure functional world. We elegantly solve this using the Option type. We can see Option as a type (to be precise it’s a discriminated union) that represent only two possibles values: A success value where it wraps up the result in the type constructor Some, and a failure which translates to the value None:

type Option<'a> =
    | Some of 'a
    | None

Now we can separate the “impure”, null-mined .NET world from our domain:

    member this.Price (id : ProductId) =
        try
            Some(inv_.[id])
        with
            | : ? System.Collections.Generic.KeyNotFoundException -> None

Now every time we ask for a product, we don’t take the risk of raising an exception, while having an Option<Price> back give us a great power, because we can pattern match against an Option type to discriminate a function behavior according to the value. Little example:

>let inv = new Inventory();;
val inv : Inventory
> inv.Stock "foo" 10.0;;
val it : unit = ()
> inv.Price "foo";;
val it : Price option = Some 10.0
> inv.Price "doesnotexists";;
val it : Price option = None

Pretty neat isn’t it? Now that we have this nice type to work with, let’s solve the second part of the problem: how to sum two or more product’s prices, displaying the sum or an error messages if some product doesn’t exist. To achieve our goal, we’ll use the Maybe monad, implemented inside the FSharpx library.

Concatenating computations

I won’t bother you with jabbering about computational expressions and so on, but I’ll show you the code. Let’s first create a function that takes the computation final result (under the form of  an Option<Price>) and print a success or a failure message:

let reporter (priceSum : Price option) : unit =
    match priceSum with
    | Some(p) -> printfn "Total price: %g." p
    | None    -> printfn "One or more id(s) not found."

Nothing particularly amazing here. Now let’s create a new infix function (for the lay people: a function that can be invoked between two parameters, in an infix way). Bear in mind that this is not always the way to go, because creating too much weird operators can lead to a less readable code, but here we won’t care and proceed anyway:

let inline (|@|) (p1 : Price option) (p2 : Price option) =
    maybe{
        let! v1 = p1
        let! v2 = p2
        return! Some(v1 + v2)
    }

Ok, so let’s clarify things a bit. The easiest way to think about monads, in my opinion, is like a sort of Lego pieces, each piece may contain a value (or not, it depends).

In this case in order to concatenate our computations we need to concatenate only the same Lego pieces together. Do you remember in the primary school when teachers keep you telling that you can’t sum pears with apples? The concept is more or less the same. So we can sum and combine only monads of the same type. But how? The answer lies in the lines of code above. With the operator let! we performs a sort of destructuring  (to be precise a monadic binding) which means that we peek inside our Lego piece and we take out the content, whether it exists or not. Yes, whether it exists or not. In this specific case, the Maybe monad ensures us that failure is propagated. In other terms, if you “sum” a Some(value) with None, we will obtain None, because None is the Zero value for that monad. I don’t want to dig too much inside this theoretical stuff, but every monad has it’s zero, a value you can sum against without having an impact on the overall computation (think about the (+) operator, 0 (zero) is the numeric value you can sum indefinitely without affecting the result). All this babbling means that if v1 and v2 binds to a “real” float, the result will be wrapped inside a Some(v1+v2), which is the real sum. Otherwise a None will be returned. Gosh, I hope is clear enough. To clarify, here is an example of our new operator in action:

> let price1 = Some(10.0);;
val price1 : float option = Some 10.0
> let price2 = Some(4.90);;
val price2 : float option = Some 4.9
> price1 |@| price2;;
val it : Price option = Some 14.9
> price1 |@| None;;
val it : Price option = None

Seen? Pretty cool, isn’t it? No meaningless exceptions, no null spreading everywhere. Just simple type who are concatenated to form a result.

The final touch: making it more general

As final step we’ll write a simple function that takes a list of ids, an inventory and prints our total whether it “exists” (i.e if every product is inside the inventory) or failure message if something goes wrong. Here we go:

let sumAndReport (inventory : Inventory) (ids : ProductId list) : unit =
    let basket = List.map (fun pid -> inventory.Price(pid)) ids
    in List.reduce (fun p1 p2 -> p1 |@| p2) basket
    |> reporter

It should be clear enough. If you are an F# newcomer, the |> is the pipeline operator, is passes the result on the right side to a function on the left. In worth noting that when we get the list of products with the basket let binding, we don’t care whether those products exist! In fact, monads (in this case the Maybe monad) abstract the computation incapsulating a success or a failure in a way that we can control, combine and mix without worrying about the rest. And this is only the tip of the iceberg!

I redirect you to this gist, where you’ll find the full source code, as well as a couple of data for testing purpose.

Conclusions

Monads are a clever idea to encapsulate a lot of things: failure, state, IO, etc.. and having monads support in F# is simply awesome. The real world can benefit from this strange creatures, I believe. In an upcoming article we’ll see how make our code even more simple, beautiful and short thanks to some feedback provided on the gist from the user mausch.

Stay tuned!

A.

Setting up a simple Mogre Application in F#

Game engine panorama is pretty crowded. There are open source ones, commercial ones and so on. Ogre is properly defined as an “Open Source 3D Graphics Engine”, which means that it is at a lower level than a fully-fledged Game Engine. You can use Ogre for 3D rendering and assemble your homemade Game Engine picking up other useful library, for example OpenAL for the sound processing and Nvidia PhysiX for the Physics. This way has been followed, for example by NeoAxis Engine.

Mogre  (quoting from the official site) ” is an advanced .NET wrapper for OGRE. It can be used by C#, Visual Basic etc. […]  The pure graphic rendering speed is similar to Ogre C++ applications, because the calculations are done by the same Ogre core library (written in C++) and the wrapped interactions are quite fast”. Since premises seemes encouranging, I’ve given Mogre a try, intrigued by the possibility to use F# for game developement (or at least for same experiments).

Installation

The installation is a piece of cake, thanks to an installer downloadable from the official site. Once installation is completed, you should have a directory labeled “MogreSDK” inside your C folder (or whatever). The next step is to build all the bundled examples (they are for 90% the same of the original Ogre package) clicking on a command script inside the SDK folder (BuildSamples.cmd for the lazy people). Now you can start the “SampleBrowser” program and test this stuff, for example “Mogre in Windows Forms”:

Cool, it worked!

Setting up a simple F# Project

Setting up an F# Project is not incredibly difficult (is pretty straightforward) thanks to a bunch of libraries called “Mogre Wiki Tutorial Framework” especially gathered to simplify the initial Mogre setup. As we can read on the Wiki this “Mini Framework” is not the ideal environment to work with, but only an aid to get started quickly with Mogre without struggling too much. As scaffolder we’ll use the Visual C# project downloadable from here (it targets .NET 4.0). Let’s see what it contains:

The “bin” directory contains all the required .dll for make our example works, and the “app.config” file is important as well, because it allows mixing assemblies compiled against different .NET versions. So let’s create another project, this file an F# solution (as Application type, leave “F# Application”), and then copy folders “bin” and “Media” and “app.config” in the newly created project. This is how the project will look like (ignore the obj directory, obviously will be generated after a successful compile):

Now the funniest part, write a program that do something useful.

Retrieve, Reuse, Revise, Retain

Before taking a leap inside the actual program, remember to add the required references for your project: you will need at least three of them: “Mogre”, “Mogre.TutorialFramework” and “MOIS”. You will found the dlls inside the bin directory. When you are ready, this is what’s inside my Program.fs:

open Mogre
open Mogre.TutorialFramework
open System

type SimpleApp() =
    inherit BaseApplication()

    override this.CreateScene() =
        this.mSceneMgr.AmbientLight <- new ColourValue(1.0f, 1.0f, 1.0f)
        let ent = this.mSceneMgr.CreateEntity("Head", "ogrehead.mesh")
        let node = this.mSceneMgr.RootSceneNode.CreateChildSceneNode("HeadNode")
        node.AttachObject(ent)

let app = new SimpleApp()
app.Go()

I’m not getting through it, because it’s a mere porting from the equivalent C# code. Once again, F# succintness and .NET thight intregration allows us to write compact and elegant code. One last subtle thing: I’ve encountered an error running my project, related to the mix of assemblies targetting different .NET version. Do you remeber the app.config file? There is a line which solves exactly this issue, but you have to copy it inside the executable directory in order to make all work. You can elegantly solve the problem with a post build rule (Project properties -> Post build event):

copy $(ProjectDir)app.config $(TargetDir)$(TargetFileName).config

And now you’ll (hopefully) be able to run your code!

You can download the full project on GitHub here.

Cheers,

Alfredo

Programming & Deployment workflow with XCode and Qt 4.7

This is just a mental note.

If you want to develop Qt Applications using XCode, this is the quickest way to achieve it:

  1. Create a new project with QtCreator
  2. Inside your new project folder create an XCode project scaffolder with:
    qmake -spec macx-xcode *project-name*.pro

    (change project-name accordingly).

  3. Open the .xcodeproj with XCode 3, or XCode 4 will crash
  4. Once opened, build it (is not important the build result, it may even fail)
  5. Open the project with XCode 4: Since you opened with XCode 3 before, now is compatible with Xcode 4 as well
  6. Code, Compile, Build as usually
  7. If you have to change the *.pro file, modify it within QtCreator, the repeat passages 2 – 6.

Now the best way to code, but it works.

Functional Reactive Programming kick-starter guide

Recently I’ve been wondering about making a simple game in Haskell (one of many attempt to realize something playable). I’ve been caught by Game Entity System, a sort of Architectural Pattern to develop game logic (read an excellent introduction here.) Nevertheless, before even starting to think how to apply it in a functional context, I’ve read another article where the emphasis was focused on Functional Reactive Programming. So I thought : Ok, I’ve only heard about FRP, but what’s all this jabber about? And more important, how it can be useful to me?

So I decided to wrap my head around it. This is a sort of preliminary diary to FRP of “The layman’s guide to FRP in practice”. I hope this will be useful to someone, or at least to me to better grasp FRP!

FRP in Haskell

If you have heard of FRP before, probably was because you are an Haskell programmer /enthusiast, because FRP seems (and I repeat, seems, don’t want to offend nobody) to be born around the Haskell Community (see Fran Papers). So the first step to understand something is to have a documentation for it. Now, this is a tricky part, because since FRP is so entangled with Academic environment, most documentation is mathematically biased. So I began my search for an usable library of something that doesn’t require you to be a Math PhD. I’ve tried a few libraries, but in the end I stick with reactive-banana: still in active development, funny name, good documentation and a tons of examples. So I started to dig inside.

Functional Reactive Programming in a nutshell

Now, don’t try to fully understand everything I will tell you, and the same applies for the code: some passages are still dark even for me. In first place I want to say thanks to the developer of Reactive Banana, Heinrich Apfelmus, for having provided the only library I can understand (I don’t want to blame Yampa or the other libraries, but this seemed to me the most straightforward to start with). Heinrich’s excellent introduction on FRP and Reactive Banana helped, too: I’ll take quotes from that introduction, when needed, so credits are due. Ah, a last thing! Reactive Programming comes in different flavours, and can be applied even in the imperative world, obviously. So the examples I’ll show you have the sole scope to  introduce you to FRP, nothing more.

A wallet

To get the gist of FRP just image a wallet, a simple leather wallet like this:

And now image a father and a son: the father, in elegant attire, and the son, in more modern clothes. Both posses a wallet, of course, but these wallet are bind by a mystical father-son rule:

The father will always have 10 dollars more than his son.

No matter what will happen, this will still remain the same. Now think about this with the eye of the imperative programmer. When an imperative programmer comes home, and work on his fantastic game “Father And Son Wallet War v. 0.0.1”, he would probably write something like this, for example, in Python:

son_wallet = Wallet(5)
father_wallet = Wallet(son_wallet.money + 10)

(Obviously this is a quick and dirty code, the sematic is real Python, but don’t expect to make it works). Now what happens when the son receives – let’s say – 50 dollars as birthday present? The imperative programmer has to update the code accordingly:

son_wallet.money += 50
father_wallet.money += 50

This is because the father, to be consistent with the father-son rules, has to update his wallet content too (let’s say with a part of his paycheck): in this way, the rule will be still valid (now the son has 55 bucks and the father 65, everything make sense). Have you seen what happened?  In the object declarations, we have expressed the father-son rule with that

son_wallet.money + 10

assignment, but one the objects have been initialized, we have lost this rule forever. While in the first snippet the father’s wallet value was dependent by the son’s wallet value, after the object initialization the two object have independent lives!  The state of one can change without affecting the other. Well, in most occasions this is the desirable behavior, but not this time, due our constrain.

Functional Reactive Programming at rescue

Now image a parallel world, in the galaxy of Functional Programming. Our functional programmer goes home, open his laptop and begin to work on “Father and Son Wallet War v 0.1 – Reactive Edition”. He thought to himself : “How can I make this program reactive to events? Well, let’s take a look to HackageDB… “, he download Reactive Banana and start reading documentation – “Ok, well, let’s see what Reactive Banana provides me..” and he discover the idea of time varying values.

“Ok!” he says “a Behavior is nothing but a value that changes over time! And why on earth a value must change? Oh, yes, it can changes after an Event!”. So our functional programmers has just discovered two important data type of RB (Reactive Banana), a Behavior and a Event. So he work hard all night long and produces this code, resulting from patchwork on several RB examples:

import Reactive.Banana as R

type Money = Int
type EventSource a = (AddHandler a, a -> IO ())

addHandler :: EventSource a -> AddHandler a
addHandler = fst

fire :: EventSource a -> a -> IO ()
fire = snd

main = do

  sources <- makeSources
  network <- setupNetwork sources
  actuate network
  fire (fst sources) ()
  fire (fst sources) ()
  fire (snd sources) ()

makeSources = (,) <$> newAddHandler <*> newAddHandler

setupNetwork (esputdollar, estakedollar) = compile $ do

  eup <- fromAddHandler (addHandler esputdollar)
  edown <- fromAddHandler (addHandler estakedollar)

  let

    -- Behavior : A VALUE that changes over time.
    -- A discrete is an observable behavior
    -- I'm saying that walletA is an accumulable value
    -- that starts from 0, and increase by 1 due to the
    -- eup event triggering, and decrease by 1 due to the
    -- edown event triggering.
    walletA :: Discrete Money
    walletA = accumD (0 :: Money) $
              ((+1) <$ eup)
              `union` (subtract 1 <$ edown)

    -- An event that is triggered when walletA changes.
    -- Allow us to "intercept" this changes and to peek
    -- inside the wallet.
    eWalletAUpdate :: Event Money
    eWalletAUpdate = changes walletA

    -- WalletB is stepper, something that starts from an
    -- initial value and that after a certain event changes
    -- in a new value.
    walletB :: Discrete Money
    walletB = stepperD (10 :: Money) $
              ((+10) <$> eWalletAUpdate)

    -- With this event I can peek inside walletB content.
    eWalletBUpdate :: Event Money
    eWalletBUpdate = changes walletB

  reactimate $ putStrLn . showDollarIncrease <$> eup
  reactimate $ putStrLn . showDollarDecrease <$> edown
  reactimate $ putStrLn . showWalletAContent <$> eWalletAUpdate
  reactimate $ putStrLn . showWalletBContent <$> eWalletBUpdate  

showDollarIncrease e = "Wallet's content increase by 1 dollar!"
showDollarDecrease e = "Wallet's content decrease by 1 dollar!"
showWalletAContent money = "Wallet's A content is now: " ++ show money
showWalletBContent money = "Wallet's B content is now: " ++ show money

He looks at the code and says “Uhm, is not straightforward like it seemed last night, let’s check it out again”. I will interpret the programmer thoughts, just trying to make them as clear as possible. So don’t panic and let’s decompose all this code with a top down approach. We want to create two values A and B, bind by a rule, i.e. value B = value A + 10, so we create two Discrete, that represent exactly this: values that change over time, and are observable. Ok, but when a value should change? It should changes when a Event occur. Let’s think about it, remembering what I’ve said to you before: what are two possible events in this simple world? Of course! The simplest events we can thing about are the event of “Adding a dollar” and the event “Taking a dollar”. But we have two more events, representing the wallet content change: sounds reasonable, isn’t it? So just recap: we have two wallet bind by a rule, and some events that can be triggered. This sounds just like an event-driven GUI programming, right? You may think events as a sort of GUI events or Javascript event (e.g. onClick, do something).

Finally understanding all this jabber

Ok, so let’s start decomposing it. Let’s start from the main:

main = do

  sources <- makeSources
  network <- setupNetwork sources
  actuate network
  fire (fst sources) ()
  fire (fst sources) ()
  fire (snd sources) ()

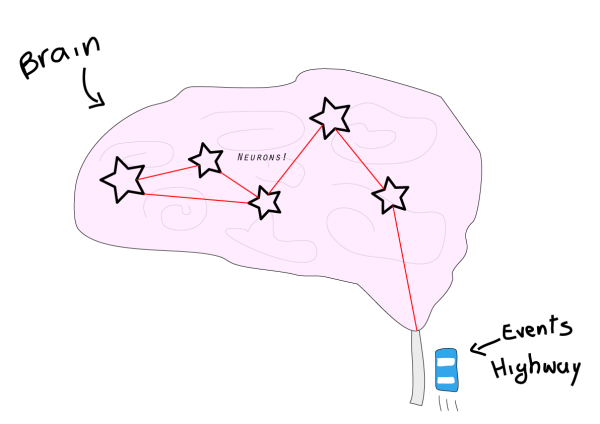
In order to trigger events, we need to create event sources, i.e. something where events born (think to them as monster spawing point. When we need to spawn a monster, it’s generated from THE source). In the same way, when we need to generate an event, we ask for it to the correct source. So now you understand why we have create the event sources with the makeSources function. Let’s move on. The next step, as you can see, is to create an EventNetwork that must express our rule. I haven’t found a better comparison for an EventNetwork than this: imagine your brain. Your brain is full of neurons, cells who are able to react to external stimulas. Neurons are pretty complex stuff, since they can react only to certains stimulas and are able to involve other neurons as well. Neural Networks are based on this simple behavior.

Why I have called our nervous system “Events highway”? Because it is, indeed! External stimulas (events) travel through your nervous system  into the brain. Here neurons can perform a sort of filtering to react only on events they are interested about. Now try to map this naive description of human body to our snippet:

setupNetwork (esputdollar, estakedollar) = compile $ do

  eup <- fromAddHandler (addHandler esputdollar)
  edown <- fromAddHandler (addHandler estakedollar)

  let

    walletA :: Discrete Money
    walletA = accumD (0 :: Money) $
              ((+1) <$ eup)
              `union` (subtract 1 <$ edown)

    eWalletAUpdate :: Event Money
    eWalletAUpdate = changes walletA

    walletB :: Discrete Money
    walletB = stepperD (10 :: Money) $
              ((+10) <$> eWalletAUpdate)

    eWalletBUpdate :: Event Money
    eWalletBUpdate = changes walletB

  reactimate $ putStrLn . showDollarIncrease  eup
  reactimate $ putStrLn . showDollarDecrease  edown
  reactimate $ putStrLn . showWalletAContent  eWalletAUpdate
  reactimate $ putStrLn . showWalletBContent  eWalletBUpdate

The first two lines simply “pop” the events from the sources, so there aren’t a big deal. Let’s focus on what happens inside the let.
We are saying: “Ok, built an event network with this features”:

  1. It can be traversed only by 4 events: eup, edown, ewalletAupdate, ewalletBupdate
  2. It has only two neurons: walletA and walletB

But we are saying more, though, we are specifying how walletA and walletB (our Father and Son wallets) are bind together:

  1. walletA (SON) is a wallet whose value increase by 1 after the event eup
  2. walletA (SON) is a wallet whose value decrease by 1 after the event edown
  3. walletA (SON) is a wallet whose initial value is 0
  4. walletB (Father) is a wallet which react to changes from A
  5. walletB (Father) is a wallet whose initial value is 10

Can you get it? Don’t worry, let’s start with the definition of walletA:

    walletA :: Discrete Money
    walletA = accumD (0 :: Money) $
              ((+1) <$ eup)
              `union` (subtract 1 <$ edown)

We are saying that walletA is an accumulator, a Behavior (a Discrete is nothing more than an observable Behavior) whose value increment over time. Yes, but how much and when? Well, it’s easy to see: its value increase by 1 on the event eup, and decrease by 1 on the event edown. union is a function used to concatenate streams of event. Pretty easy, isn’t it?
But we haven’t finished yet. We need an event that allows us to peek inside the wallet, just to print its value. So let’s write this event:

eWalletAUpdate :: Event Money
eWalletAUpdate = changes walletA

changes is a function that return an event when a Discrete changes, we definitely need it!

And what about our father? Well, let’s investigate:

    walletB :: Discrete Money
    walletB = stepperD (10 :: Money) $
              ((+10) <$> eWalletAUpdate)

Our walletB is always a Discrete, but of a different breed: it’s a stepper, a value that starts from 10 (in this case), and when a certain events is triggered, it update its value. This update is an overwrite, though, so we lose the previous value. But if you think about it, it’s what we want: we wanna update the previous value with the new one (took from our son’s wallet) and to add 10 dollar to enforce our rule: now it will be no mystery why we used the eWalletAUpdate as trigger.
Just like walletA, we need an event to peek inside the wallet:

eWalletBUpdate :: Event Money
eWalletBUpdate = changes walletB

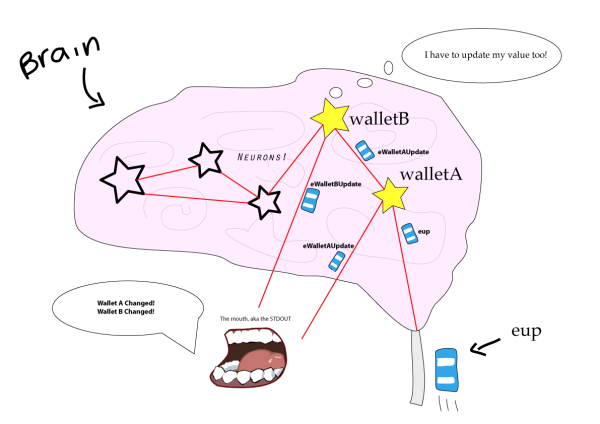
Now let’s see what happens when the event eup enters our highway:

Sweet! The event eup caused our Father’s wallet to update this value as well! You can see what happened in this way: a car named eup arrived to our brain. This car stimulated the neuron walletA, which produced an event as well: eWalletAUpdate. This brand new car traveled as well to all available roads, until it reached walletB and the mouth. walletB, though, when sees that car says “Gosh, I have to update my value too!” and send out another car, eWalletBUpdate. Have you grasped the concept? I hope so!

The last three lines of the main start the whole thing. They trigger three events, two eup cars and one edown car, and send this 3 cars inside our brain. Just to prove what I’ve just said, this is the output of the program:

Wallet's content increase by 1 dollar!
Wallet's A content is now: 1
Wallet's B content is now: 11
Wallet's content increase by 1 dollar!
Wallet's A content is now: 2
Wallet's B content is now: 12
Wallet's content decrease by 1 dollar!
Wallet's A content is now: 1
Wallet's B content is now: 11

It’s worth noting that the update of A and B occurs automatically, without any kind of assignment. Now you can see why FRP is so appealing: it allows you to specify relations between entities and to make this relations hold for you automatically.

Final thoughts

I hope you will forgive some mistakes and some simplification in this articles, as well as my English (I’m not a mother tongue, as you would have notice).  I’m still learning Haskell, FRP and RB, so my knowledge is far limited.

Comments are obviously welcome,

Bye!

Alfredo

Fixing Lispbuilder-SDL (SB-INT:C-STRING-DECODING-ERROR :UTF-8 1)

Just more than a mental note for myself.

If playing with Lispbuilder-sdl you caught the error:

(SB-INT:C-STRING-DECODING-ERROR :UTF-8 1)

The solution is to locate the stdinc.lisp file under

quicklisp/dists/quicklisp/software/lispbuilder-20110619-svn/lispbuilder-sdl/cffi

And change all the occurrences of “putenv” into “setenv”.

Seems ok now. Tested under SBCL 1.0.54

ANN: Textmate 2 Common Lisp bundle

Hi everyone,

finding the perfect programming environment is a rough task, something akin to the search for the sense of life of the holy Graal. However, I think that this time I’m on the right track, or at least close to the perfection.

Fact 1: Common Lisp

Recently I’ve fallen in love (again) with Common Lisp: this kind of things happens in regular cycles, where I program for a while with a language, leave it behind, turn my attention to another one, to finally come back to the first one. This happened for Common Lisp, Clojure, Haskell and so on. Maybe this time of the year is my “Lisp time slice”.

Fact 2: Lispers love Emacs

If you ask to a random pick of 100 programmers, probably you’ll got 100 different answers to the question “What’s your favourite editor?”. By the way, two common answers are “Emacs” and “Vim”. I tried them both, but I’m not fully satisfied neither from Emacs nor from Vim. Let’s say that I like 50% of Emacs’ features and the same applies for Vim, but I’ve always found Emacs and Vim a general purpose solution not close to the cool look and feel and speed of Cocoa Native Applications.

Fact 3: TextMate 2

It happened that on December 15th, Macromates has finally released the alpha version of TextMate 2: best of all, for the TM1 users, this is a free upgrade, so I haven’t hesitated, and downloaded it instantly. TM2 offers many new cool enhancements, like tab support and a sort of manager that allow you to choose, download and keep updated tons of themes and bundle. One cons is that, at least for now, TM1 Bundles are not supported, so the only way you have to use an old fashioned TM1 Bundle is to manually convert to TM2: fortunately is not an hard task (let’s say a trivial one).

Fact 4: The Hound of the Baskervilles

The Hound of the Baskervilles is the third of four crime novels by Sir Arthur Conan Doyle featuring the detective Sherlock Holmes. Originally serialised in The Strand Magazine from August 1901 to April 1902, it is set largely on Dartmoor in Devon in England’s West Country and tells the story of an attempted murder inspired by the legend of a fearsome, diabolical hound.

Am I crazy, reporting the Wikipedia description of a book by Sir Arthur Conan Doyle? Nope, and you’ll find out why. TextMate 1 got an extremely sexy Bundle for Common Lisp, developed by Bastien Dejean (credits are due). As I said before, this was not compatible with TM2, so I decided to convert this for TM2, and finally have a cool environment to work with. For some unfathomable reasons it revealed a tricky task, so I thought that a blog post is necessary to celebrate my success.

Fact 5: tmux

tmux is a terminal multiplexer: it enables a number of terminals (or windows), each running a separate program, to be created, accessed, and controlled from a single screen. tmux may be detached from a screen and continue running in the background, then later reattached. In a nutshell, the bundle use this to create a new SBCL session, and provide a mechanism to send and receive input/output from/to a terminal. So your workflow become:

  1. Open a new session (from TM)
  2. Attach to the newly created session (always from TM)
  3. Write a bunch of functions (higher order is preferred, cit.)
  4. Evaluate them sending to a running instance of SBCL
  5. Receive the response as growl notices
  6. Have fun!

The only tricky part of the conversion was that tmux 1.5 removed the -t option for load-buffer, a command heavily used from the Bundle to manage the communication with the SBCL instance, but I couple of bash if allowed me to extend the compatibility even to tmux 1.5.

After this little complication, I was able to successfully convert the bundle: you can download it from here, and watch the screencast Bastien has prepared for us!

Personally I think that I have everything I need to rapidly prototype and code in Common Lisp, and this bundle can easily adapted for Clojure and Haskell too! Best of all, TM2 is also faster the his grandaddy, so I’ve found the entire working process leaner and faster!

I hope you’ll enjoy this as much as I’ve enjoyed.

Cheers,

Alfredo

Should GHCI be faster?

Hi everyone,

finally I came back to write after a little break (I’m having rough time writing my thesis). A thing I really like is to implement project Euler’s problems with several languages, just to performs same silly benchmarks. A long time ago I’ve coded the solution of  Problem # 5 in Common Lisp (although you can search and find, within this site, implementations in Racket and Clojure). It run in about 10 seconds with SBCL:

(defun div1-x-p (divisor num)
  "Checks if num is evenly divisible for all number below divisor"
  (cond
    ((= 1 divisor) t)
    ((/= 0 (mod num divisor)) nil)
    (t (and t (div1-x-p (1- divisor) num)))))

(defun project-euler-5-solver (acc)
  (if (div1-x-p 20 acc)
      acc
      (project-euler-5-solver (1+ acc))))

It’s a bit naive, but I’m not going to focusing on this, while I report an optimized version user knobo posted between article’s comments:

(defun solver ()
	(declare (optimize (speed 3) (space 0) (safety 0) (debug 0)))
	(loop for num of-type fixnum from 1
		until (loop for divisor of-type fixnum from 20 downto 1
		always (zerop (mod num divisor)))
		finally (return num)))

You can even compile this after having loaded it inside SBCL:

(load "euler5.lisp")
(sb-ext:save-lisp-and-die "euler5" :executable t :toplevel 'solver))

This version run in about 3.8 seconds, since there is not much difference between the compiled and interpreted version. The version which uses lcm as fast as the Haskell one, instead:

(reduce 'lcm (loop for div of-type fixnum from 20 downto 1 collect div))

Since I’ve been wondering for a while how Haskell would perform in this particular problem, I’ve written a simple solution of the same problem:

import Data.List

solver :: Maybe Integer
solver = find (\x -> divPred x) [20,40..]

divPred :: (Integral a) => a -> Bool
divPred x = all (\y -> x `mod` y == 0) [20,19..2]

main :: IO ()
main = do
  putStrLn $ show solver

Ok, what about this? The compiled version is obviously blazing fast, and it took only about 1.8 second on my machine. Nevertheless the interpreted version is really slow: it takes about 57 seconds!! (Although you can type :set -fobject-code just before loading the script, and ghci will compile it under the hood as a .o file. Thanks to Svein Ove for the tip).
For the sake of completeness, you can try this outstanding solution for the problem gave me from the user Hammar:

solver = foldl1 lcm [1..20]

main :: IO ()
main = do
  putStrLn $ show solver

And these are the execution times:

alfredodinapoli$ time euler5
232792560

real	0m0.006s
user	0m0.001s
sys	0m0.003s

Pretty impressive, aren’t they? But for now, we will concentrate only on the naive implementation.

As you can imagine, I’m bit disappointed on the fact that my current favorite functional programming language is so slow, for this particular tasks, if interpreted.

Life is full of ladders

Some days ago, for accident I stumbled upon this interesting (and famous) benchmark, comparing several programming languages. As you can see, Haskell is one of the fastest languages, even though Scala is some step upper into the main score. I’ve decided, just for completeness and curiosity, to implement the problem #5 even in Scala, with a big disclaimer: I hadn’t written a single line of Scala until this afternoon, and this is the result:

def divPred(x : Int): Boolean =
	{
	    Range(20,1,-1).forall(x % _ == 0)
	}

	def solver(): Option[Int] =
	{
		Range(20,1000000000,20).find(divPred _)
	}

	def timeIt()
	{
		val start = System.currentTimeMillis()
		printf(solver().toString())
		val end = System.currentTimeMillis()
		println((end - start).asInstanceOf[Float] + " msecs")
	}

This took about 3 seconds interpreted and more or less the same time even compiled, so there is not a big different but, I mean, it took 3 seconds even interpreted!

Conclusions, thoughts, open questions

Now, despite I think Scala is a nice piece of software, I can’t stand the fact that is Java based. But the point is not “Scala is better then Haskell”, because Haskell can be compiled with -O2 and everything is blazing fast. The point is: Why Haskell can be blazing fast even compiled but Scala can? I suspect there are several reasons behind it, like the JIT compiling and other sharp optimization Scala and Java do in the background… Yes, but why not Haskell?

This is not a troll post, is a reflection and an input to other Haskellers out there to improve again and again Haskell to make it the perfect functional language. And just before you will post “cutting-edge” solutions, I will advice you: The main point of this post is not to demonstrate that a super-optimized Haskell program can lower the execution time, because I have written the two implementation acting just as a guy who try the languages “out-the-box”: everyone coming from a functional background should be able to:

  1. Search the main documentation library for “famous” functions like “all, any, filter, map, etc”
  2. Be able to implement a simple and naive problem only with this construct
  3. Compare the execution times

This obviously stands for every language.That’s my opinion. And yours?

Cheers,

Alfredo

Let’s make an Elemental Battle System in Haskell – Part IV

You can call this “EBS v. 3.5”, because I’m not showing here so much big improvements. I’m gonna focus on two main points:

  1. Some little refactoring (thanks to your comments)
  2. Implementation of custom spell behavior

A little less refactoring

Our already discussed isWeakTo and isStrongAgainst functions were relying on pattern matching in this fashion:

isWeakTo :: TargetableUnit -> Maybe Element -> Maybe Bool
m `isWeakTo` elem = case elem of
                         Just e -> checkProperty m ((==e) . succ)
                         _ -> Nothing

Uhm.. we are continuously putting in and getting out things from a context.. yes, this is a work for ours lovely Monads!

isWeakTo :: TargetableUnit -> Maybe Element -> Maybe Bool
m `isWeakTo` elem = elem >>= (\e -> checkProperty m ((==e) . succ))

Cool! Only two lines! But what are we really doing? Well, we take a value within a context (a Maybe Element) and we give it for lunch to our >>= operator: it takes our elem, unbox it (revealing an Element e or Nothing if nothing’s there), and giving it to our checkProperty function for dinner. We don’t have to put the result into a context again, because checkProperty returns a Maybe Bool, i.e. a Bool inside the failure context (Maybe). Pretty cool, isn’t it? Same applies for isStrongAgainst

A custom spell behavior

So far we have created a Spell, to cast against some TargetableUnit: we have a simple function called cast that takes a Spell and a TargetableUnit, and does the dirty job:

cast :: Spell -> TargetableUnit -> TargetableUnit
cast s t =
    let coeff = getDmgMult t (spellElem s)
        in case spellEffect s of
            Damage hit mana -> t {hp = hp t - floor (fromIntegral hit * coeff),
                                  mp = mp t - floor (fromIntegral mana * coeff)}
            Inflict statList -> let sList = status t
                                    in t {status = nub (sList ++ statList)}

But our spell type is quite limited: it can only inflict some damage or some status. As you may remember, some cool spells, or items, could do some special tricks based, for example on the target life. Let’s take two examples:

  1. An Elixir – Fully restores HP/MP
  2. The Laser spell (Do you remember? you can learn it from enemies through the Enemy Skill materia in FFVII) – cut by half enemy’s life

How can we do to implement this custom behavior? Fortunately,  the solution is pretty easy: let’s add a brand new SpellEffect!

--Essentially the result of a spell cast
data SpellEffect = Damage HitPoints ManaPoints
                 | Inflict [Status]
                 | Custom (TargetableUnit -> TargetableUnit)

--Essentially a magic
data Spell = Spell{spellName :: String,
                   spellDesc :: String,
                   spellCost :: Integer,
                   spellElem :: Maybe Element,
                   spellEffect :: SpellEffect}

instance Show Spell where
    show x = spellDesc x

Note: I’ve added the spellDesc because it can be pretty-printed with show. What have we done? We are currently saying that a Spell can do three things:

  1. Deals damage
  2. Inflicts some status
  3. A custom behavior, i.e. a function we could define and that be used to perform actions based of target properties!!
Let’s see how this reflects to our cast and use functions:
cast :: Spell -> TargetableUnit -> TargetableUnit
cast s t =
    let coeff = getDmgMult t (spellElem s)
        in case spellEffect s of
            Damage hit mana -> t {hp = hp t - floor (fromIntegral hit * coeff),
                                  mp = mp t - floor (fromIntegral mana * coeff)}
            Inflict statList -> let sList = status t
                                    in t {status = nub (sList ++ statList)}
            Custom f -> f $ t

--(INSIDE Item.hs)
data ItemEffect = Restore HitPoints ManaPoints
                | Cure [Status]
                | Custom (TargetableUnit -> TargetableUnit)

--Use the item i on the target t
use :: Item -> TargetableUnit -> TargetableUnit
use i t = case (itemEffect i) of
               (Restore hp' mp') -> t {hp = hp t + hp', mp = mp t + mp'}
               (Cure rList) -> t {status = filter (\s -> s `notElem` rList) $ status t}
               (Custom f) -> f $ t

Obviously same applies to Item type. Ok, cool! So let’s define 1 item and 1 spell, what about an Elixir and the laser spell?

--Inside Item.hs
elixirBehaviour :: TargetableUnit -> TargetableUnit
elixirBehaviour t = t {hp = maxHp t, mp = maxMp t}
elixir = Item "Elixir" "Fully restores HP and MP" (Custom elixirBehaviour)

--Inside Spell.hs
laserBehaviour :: TargetableUnit -> TargetableUnit
laserBehaviour t = t {hp = floor $ (fromIntegral $ maxHp t) / 2.0}
laser = Spell "Laser" "Cut by half target's health" 20 Nothing (Custom laserBehaviour)

Ok, now it’s time for the meat: let’s test them!

Ok, modules loaded: EBS.Main, EBS.Elemental, EBS.Target, EBS.Status, EBS.Spell, EBS.Item, EBS.MonsterPark.
ghci> piros
Unit {name = "Piros", level = 1, hp = 300, maxHp = 300, mp = 50, maxMp = 50, strength = 10, dexterity = 10, vitality = 10, magic = 10, spirit = 10, luck = 10, elemType = Just Fire, status = []}
ghci> let damaged_piros = cast laser piros
ghci> damaged_piros
Unit {name = "Piros", level = 1, hp = 150, maxHp = 300, mp = 50, maxMp = 50, strength = 10, dexterity = 10, vitality = 10, magic = 10, spirit = 10, luck = 10, elemType = Just Fire, status = []}
ghci> use elixir piros
Unit {name = "Piros", level = 1, hp = 300, maxHp = 300, mp = 50, maxMp = 50, strength = 10, dexterity = 10, vitality = 10, magic = 10, spirit = 10, luck = 10, elemType = Just Fire, status = []}

Wow, they works! The lamba wizard seems to approve:

Ah, bear in mind that I’ve changed the minimal context value of the Spell status to be [] (empty list), because [] is the minimal context for the lists, and we can use cool Monads tricks as usual!

Git repo is in the same place! Enjoy!

Alfredo

Book review: Learn You a Haskell for Great Good!

Hi everyone,

this is the first book I write about, but it’s so well written and amusing that I’ve decided to blog my personal review.

As it started

Well, let’s start from the basics: Learn You a Haskell  is an amazing book  you can read online for free, or even buy the printed edition (as I did). In my opinion it’s definitely the best book on Haskell around. I stumbled  upon this book accidentally: I was just bored, looking for some new cool programming language to learn. I’ve already met Haskell six months ago, but it rapidly lost in interest because I judged it too weird and complicated, studying it on the famous “Real World Haskell“. Meanwhile, I’ve played a lot with Clojure and Lispy stuff. One day, I decided that I want to learn a language not only cool, expressive and functional as Clojure, but that I wanted a language to be fast and that can be compile cross platform (and functional, of course!) so I’ve thought about Haskell. Looking around into the books panorama, I found the site and the book: when I saw that it was edited by the amazing No Starch Press, featuring also the awesome Land of Lisp, I had no more doubt, I just bought it!

From rookie to master in 15 colorful chapters

This book is a little miracle indeed: you start thinking “Oh my God I’m an Haskell newbie, I won’t grasp Monads and other scaring stuff” and you finished thinking “So this are Monads about? They are so simple, it can be!”. The author guides you through all 15 chapters with a step-to-step approach: your path from functors to monads is built brick after brick. The amusing thing is that I’m reading it (indeed I haven’t finished it yet, 30 pages left 😛 ) at night just before going to sleep, and it’s so clear and simple that I can even understand everything!

Technically speaking, this book simply saved Haskell for me: before it, I considered Haskell a not-so-cool functional language, but this book changed everything.

The book, squeezed up

I’ve decided to go a step further into this book review, summarizing and giving an opinion of every book’s chapter:

  1. Starting Out: Your first Haskell file, plus a lot of cool stuff, e.g. ranges and list comprehensions. You will end thinking “Why I need range(1,20) or “for i = 0; i < 20; i++” when I have 1 .. 20? List comprehensions are awesome, too.
  2. Types and Typeclasses: Some Haskell’s basic types acquaintance. You will go deeper into the topic starting to Chp. 7
  3. Syntax in Functions: some basic syntax you can live without. You can already write some non-trivial functions, in my opinion; they will be a little verbose, but correct.
  4. Recursion: If you are familiar with functional language, go swiftly and fast through this.
  5. Higher Order Functions: the Haskell awesomeness begin to emerge. Haskell is a language where you have some kind of cool stuff just out-the-box: currying, lazyness and more. Sure, they come with a price, but come on, just enjoy them meanwhile!
  6. Modules: you will struggle with modules, and this chapter helps you to get thing a little less painful.
  7. Making Our Own Types and Typeclasses: by far, one of most important chapter: if you wanna do serious Haskell development make sure to squeeze out this chapter and the beautiful Haskell Type System. As a bonus, your first encounter with Functors!
  8. Input and Output: a light and pleasant chapter about Haskell IO. My advice is to skip this chapter and the next one for now. Come back with your overpowered Monad knowledge, and things will be much clearer (despite the fact they are clear even without any preliminar Monad knowledge).
  9. More input and output: I don’t know why, this chapter is not present into the online version: the author preferred to merge its content into the Chp. 8 (see above).
  10. Functionally Solving Problems: You can skip this, a collection of problems solved with functional thinking. Useful to take a pause and do some practice.
  11. Functors, Applicative Functors and Monoids: Here the author have merged all the cool stuff into this chapter, but into the printed version Chp. 11 is just “Applicative Functors”, and it’s only dedicated to that topic. Strange. In this extra-condensed chapter you will encounter functors, applicative functors (beefed-up functors) and monoid (for wrapping existing types). With them you will be finally able to respond to this question “What the hell Maybe is useful about?”
  12. A Fistful of Monads: Correspond to the book’s 13th Chapter. You will finally meet the legendary creature of Haskell programming: the powerful and terrifying Monad (I don’t why I thing to a Monad as a tibetan Monk).
  13. For a Few Monads More: After having grasped what monads are about, you’ll met useful and fantastic Monad, such as Writer, Reader and the atomic-one: the State Monad!
  14. Zippers: Perfect conclusion for the book; learn to use powerful Haskell functions based on Monoids and Monads

Conclusion

Learn You a Haskell is an amazing book, written by a very passionate author, for a fantastic programming language, Haskell. Give them both a try, you won’t regret! After all, Ada language is used into mission critial software, and Haskell has been influenced by Ada: This can’t be for accident, after all, don’t you believe?

See you!

Alfredo

Let’s make an Elemental Battle System in Haskell – Part III

Hi everyone,

in the last post we have played a bit with TargetableUnit(s) and cast some spell over some poor old monster. Now it’s the time to go a step further into the development of our mini system and add another useful piece of gameplay: Items!
With items you can  cure altered status and/or restore health and mana points. As you may guess, we are going to model Items just as usual, through records:

import EBS.Target
import EBS.Status
import Control.Applicative

data Item = Item{itemName :: String,
				         itemDesc :: String,
                 itemEffect :: ItemEffect} deriving (Show)

data ItemEffect = Restore HitPoints ManaPoints
                | Cure [Status] deriving (Show)

--Use the item i on the target t
use :: Item -> TargetableUnit -> TargetableUnit
use i t = case (itemEffect i) of
               (Restore hp' mp')  -> t {hp = hp t + hp', mp = mp t + mp'}
               (Cure rList) -> let newStatus = filter (\s -> s `notElem` rList) <$> (status t)
                                      in case newStatus of
                                              (Just []) -> t {status = Nothing}
                                              _ -> t {status = newStatus}

--Some Items
potion = Item "Potion" "Restores 100 HP" (Restore 100 0)
ether = Item "Ether" "Restores 100 MP" (Restore 0 100)
antidote = Item "Antidote" "Cures Poison status" (Cure [Poison])

Ok, so what I have done here? Simply I’ve created a new type, an Item, with name, description and the item effect, i.e. what happens when an item is used upon a TargetableUnit. As you can see, an Item can restore a certain amount of HitPoints or ManaPoints as well as cure some altered status. Let’s take a look to our use function:

--Use the item i on the target t
use :: Item -> TargetableUnit -> TargetableUnit
use i t = case (itemEffect i) of
               (Restore hp' mp')  -> t {hp = hp t + hp', mp = mp t + mp'}
               (Cure rList) -> let newStatus = filter (\s -> s `notElem` rList) <$> (status t)
                                      in case newStatus of
                                              (Just []) -> t {status = Nothing}
                                              _ -> t {status = newStatus}

It takes an Item, a TargetableUnit and returns a new TargetableUnit, that will be healed or cured from some status. The most interesting part of this function is the second branch of the first case expression, when we manage the case (Cure rList): Essentially we have a TargetableUnit that can be or not affected by some status (I remember you that status is modeled as status :: Maybe [Status]) but we don’t know a priori if that unit have some altered status or not. We’ll use applicative functors to smartly get rid of cured status: we’re filtering the list of status leaving only those status who are not present into the rList (the list who contains the status cured by that item). We use the fmap alias, <$>, to put our function into the Maybe context: we’ll obtain either the new status list, or Nothing is the unit was not affacted by any status (therefore there wasn’t any status to cure). One special case: if we cure all the unit’s status we’ll obtain an empty list, but we want a Nothing value instead, so we have to handle this case properly (see the last case expression).

Gimme some modifier

One flaw of our Battle System was that every spell dealt always the same amount of damage, ignoring inter-element weakness or strengths.  This new version of the cast spell handles this: if some unit is weak against some element, the correspondent spell will deal double damage, converse applies, with only half damage dealt to a unit strong against some element:

--cast function
cast :: Spell -> TargetableUnit -> TargetableUnit
cast s t =
    let coeff = getDmgMult t (spellElem s)
        in case spellEffect s of
            Damage hit mana -> t {hp = hp t - floor (fromIntegral hit * coeff),
                                  mp = mp t - floor (fromIntegral mana * coeff)}
            Inflict statList -> case (status t) of
                                     (Just sList) -> t {status = Just $ nub (sList ++ statList)}
                                     Nothing -> t {status = Just statList}

--the damage multiplier function
--Ugly, can I do better?
getDmgMult :: TargetableUnit -> Maybe Element -> Double
getDmgMult t e = case t `isWeakTo` e of
                      Just True -> 2.0
                      Just False -> case t `isStrongAgainst` e of
                                         Just True -> 0.5
                                         Just False -> 1.0
                                         _ -> 1.0
                      _ -> 1.0

Probably I haven’t grasp all the advanced Haskell concept yet, because this function look a little ugly and too pattern matching dependent, but I couldn’t do better. In order to make this works we need to modify our “isWeakTo” and “isStrongAgainst” function in order to accept a Maybe Element: it quite makes sense if you think about it, because no Element translates into a Nothing value:

--If the monster hasn't got any element, the result will be Nothing.
isWeakTo :: TargetableUnit -> Maybe Element -> Maybe Bool
m `isWeakTo` elem = case elem of
                         Just e -> checkProperty m ((==e) . succ)
                         _ -> Nothing

isStrongAgainst :: TargetableUnit -> Maybe Element -> Maybe Bool
m `isStrongAgainst` elem = case elem of
                                Just e -> checkProperty m ((==e) . pred)
                                _ -> Nothing

Ok! So we have monsters, we have some spells and some items, we can damage monster or even heal them (such a fool action!).
Let’s give this code a try:

ghci> :l EBS/Main.hs
[1 of 7] Compiling EBS.Status       ( EBS/Status.hs, interpreted )
[2 of 7] Compiling EBS.Elemental    ( EBS/Elemental.hs, interpreted )
[3 of 7] Compiling EBS.Target       ( EBS/Target.hs, interpreted )
[4 of 7] Compiling EBS.Item         ( EBS/Item.hs, interpreted )
[5 of 7] Compiling EBS.Spell        ( EBS/Spell.hs, interpreted )
[6 of 7] Compiling EBS.MonsterPark  ( EBS/MonsterPark.hs, interpreted )
[7 of 7] Compiling EBS.Main         ( EBS/Main.hs, interpreted )
Ok, modules loaded: EBS.Main, EBS.Elemental, EBS.Target, EBS.Status, EBS.Spell, EBS.Item, EBS.MonsterPark.
ghci> piros
Unit {name = "Piros", level = 1, hp = 300, mp = 50, elemType = Just Fire, status = Nothing}
ghci> let cursed_piros = cast frogSong piros
ghci> cursed_piros
Unit {name = "Piros", level = 1, hp = 300, mp = 50, elemType = Just Fire, status = Just [Frog,Sleep]}
ghci> use remedy cursed_piros
Unit {name = "Piros", level = 1, hp = 300, mp = 50, elemType = Just Fire, status = Just [Frog]}
--Wake up, Piros!
ghci> cast earth piros
Unit {name = "Piros", level = 1, hp = 0, mp = 50, elemType = Just Fire, status = Nothing}
--The original piros bind, double damage! (Earth deal 150 dmg, 300 to piros since it's weak to Earth)
ghci> cast fire piros
Unit {name = "Piros", level = 1, hp = 200, mp = 50, elemType = Just Fire, status = Nothing}
--Normal damage, 100 hp.

Now we miss only the most important thing: a Player!
Stay tuned!

Ah, I’ve opened yet another git repo here, so you can download the fully working code! Just run ghci into the parent directory and import the module in this way:

:l EBS/Main.hs

Enjoy!